

7 Essential Tools for a Home Barista Setup
Table of Contents
- Quick Comparison: 7 Essential Home Barista Tools
- 1. Coffee Grinder: The Foundation of Your Home Barista Setup
- 2. Precision Scale: Measuring for Consistency
- 3. Tamper and Distribution Tools: Perfecting the Puck
- 4. Temperature-Controlled Kettle: Precision Pouring
- 5. Milk Frothing Pitcher and Microfoam Tools
- 6. Knock Box and Cleaning Supplies: Maintenance Essentials
- 7. Fresh Roasted Coffee Beans: The Ingredient That Matters Most
- Workflow Ergonomics and the Budget-to-Pro Upgrade Path
- Frequently Asked Questions
Last Updated: September 11, 2026
Quick Comparison: 7 Essential Home Barista Tools
A complete home barista setup is seven tools that control grind, dose, temperature, and extraction consistency. Get these right and a modest machine can outperform a café; skip them and expensive gear produces mediocre shots.
| # | Tool | Primary Job | Priority |
|---|---|---|---|
| 1 | Burr grinder | Consistent particle size | Buy first |
| 2 | Precision scale | Accurate dose and yield | Buy first |
| 3 | Tamper + distribution tool | Level, even puck | Buy first |
| 4 | Temperature-controlled kettle | Stable brew temperature | Pour-over essential |
| 5 | Milk frothing pitcher | Microfoam for latte art | If you drink milk drinks |
| 6 | Knock box + cleaning supplies | Maintenance and hygiene | Buy early |
| 7 | Fresh roasted beans | Flavor foundation | Ongoing |
Order matters more than brand names: a grinder upgrade changes the cup; a prettier tamper handle does not.
1. Coffee Grinder: The Foundation of Your Home Barista Setup
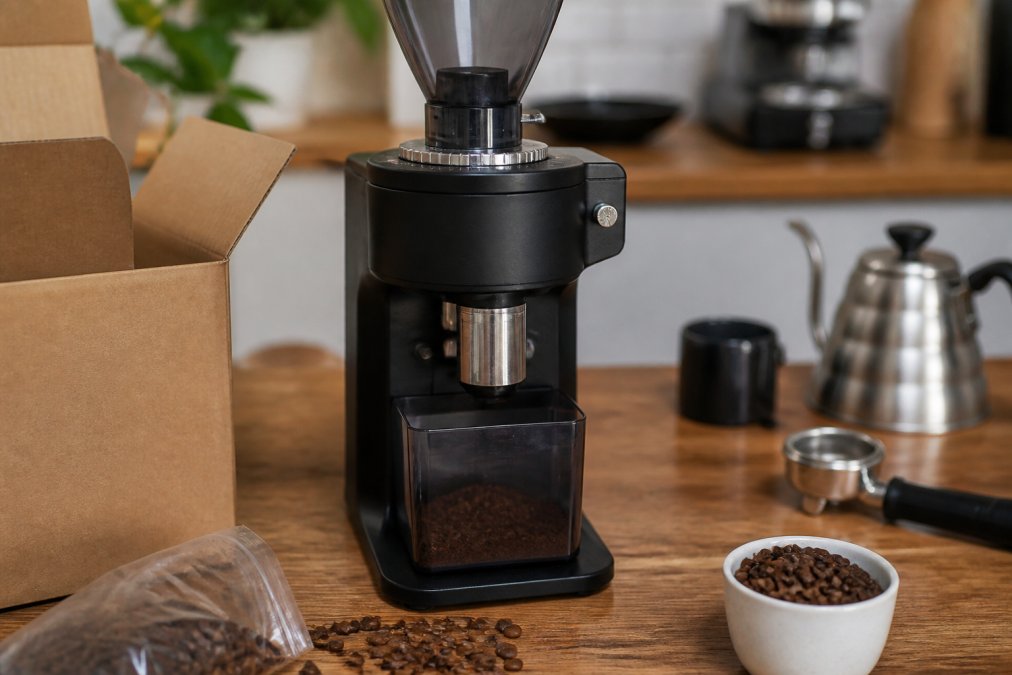
The grinder is the single most important purchase in any home barista setup: grind consistency determines whether water extracts evenly. A $200 machine with a good burr grinder beats a $2,000 machine fed pre-ground coffee.
Burr vs. Blade: Why It Matters
Burr grinders crush beans between two abrasive surfaces set to a fixed distance, producing uniform particles. Blade grinders chop with a spinning blade, producing dust and boulders that extract unevenly. For espresso, channeling is almost always a grind problem before a technique problem.
The Baratza Encore is the standard entry point: 40 grind settings, a high-torque DC motor, and user-serviceable parts. It handles pour-over and drip beautifully but isn't optimized for fine espresso, so espresso-focused buyers should budget upward.
2. Precision Scale: Measuring for Consistency
A precision scale is the only way to repeat a good shot: espresso is a ratio problem before it's a taste problem. Standard practice is a brew ratio between 1:2 and 1:2.5, 18 grams of dry coffee yielding roughly 36 to 45 grams of liquid espresso (sca.coffee).
The Timemore Black Mirror Basic Pro covers what most home baristas need: 0.1g accuracy, a flow rate monitor, USB-C charging, and a water-resistant surface. Weigh your dose before grinding and your yield during the shot, if you're not weighing output, you're guessing.
3. Tamper and Distribution Tools: Perfecting the Puck
Tamping and distribution tools eliminate the two variables that ruin shots: an uneven bed and an unlevel tamp. Distribution comes first. A WDT tool uses fine stainless steel needles to break up clumps before tamping; the MHW-3BOMBER WDT tool does exactly this, with a noticeable effect on extraction consistency.
For tamping, a spring-loaded tamper removes the pressure guesswork. The Normcore is calibrated to roughly 25 pounds and self-levels, giving a level puck every time. A magnetic dosing funnel like the Breville 54mm model keeps grounds off your counter, though it only fits 54mm portafilters.
4. Temperature-Controlled Kettle: Precision Pouring
A temperature-controlled gooseneck kettle gives you two things a stovetop kettle can't: exact water temperature and controlled flow rate. For pour-over, both directly affect extraction.
The Fellow Stagg EKG offers variable temperature control in 1-degree increments, a precision gooseneck spout, a 60-minute hold mode, and an LCD display. It's the most expensive tool on this list; what you're paying for is repeatability, the same temperature every morning without a thermometer and a stopwatch.
If you brew exclusively espresso, you can skip this one. If pour-over is part of your routine, it's close to essential.
5. Milk Frothing Pitcher and Microfoam Tools
Milk texturing is where home setups most often fall short of café quality, usually because the steam wand is weak, the pitcher is the wrong shape, or the milk is the wrong fat content. Microfoam, milk aerated into a dense, glossy texture with bubbles too small to see, makes latte art possible, and depends on pitcher geometry, milk type, steam wand power, and technique.
Pitcher Size and Spout Shape
Pitcher capacity should match your drink volume, not your ambition. A common pattern is:
- 12 oz pitcher for a single 6-8 oz latte or cappuccino. Small pitchers heat faster and give you more control over the vortex.
- 20 oz pitcher for two drinks at once or a 12 oz mug. Larger pitchers are harder to spin milk in with a weak wand.
- Tapered spout for latte art pours. A sharp, narrow spout gives you a thin, controllable stream for drawing; a wide spout dumps milk too fast to shape a rosetta.
Stainless steel is standard because it transfers heat, so you can feel when the pitcher hits the right temperature. A rounded bottom helps the milk spin into a vortex instead of sloshing.
Milk Choice Matters More Than Most Guides Admit
Whole milk (roughly 3.25% milkfat) produces the most stable microfoam because fat and protein stabilize the bubble structure. Reduced-fat and skim milk foam faster but collapse sooner. Oat milk labeled "barista" is formulated with added oils and stabilizers to foam like dairy; standard oat milk will not. Soy and almond vary widely by brand, so look for a barista-specific version.
Technique: The Two-Phase Steam
The process splits into two phases:
- Stretch (aeration). Submerge the tip just below the surface and introduce air with a short, controlled hiss. This sets bubble size, too long and you get dry, stiff foam; too short and you get hot milk with no texture.
- Texture (vortex). Lower the tip deeper and angle the pitcher so the milk spins, breaking large bubbles into microfoam.
Stop when the pitcher is too hot to hold comfortably against your palm, roughly 140-150°F. Beyond that, proteins denature and the milk tastes cooked.
When Your Steam Wand Isn't Enough
If your machine's steam wand can't produce enough pressure, the Subminimal Nanofoamer is a legitimate workaround: a handheld frother that creates genuinely good microfoam, in battery or rechargeable versions. It requires practice but costs a fraction of a machine upgrade. A bell-shaped manual frother or French press plunger can aerate milk in a pinch, though neither produces true microfoam.
6. Knock Box and Cleaning Supplies: Maintenance Essentials
Cleaning supplies protect both your equipment and the flavor of every subsequent shot, old coffee oils turn rancid. A knock box gives you a dedicated place to eject spent pucks; the Ikape has a non-slip base, a shock-absorbent knock bar that protects the portafilter, and a removable inner container. It costs counter space, which is the tradeoff.
Beyond the knock box, you need a cleaning brush for the group head and grinder burrs, plus backflushing supplies if your machine supports it, backflushing cycles water and cleaner through the group head to clear built-up oils. Descaling removes mineral scale from the boiler and should follow your machine manufacturer's schedule.
7. Fresh Roasted Coffee Beans: The Ingredient That Matters Most
Fresh roasted beans are the ingredient the entire setup exists to serve, and freshness is measured from the roast date, not the expiration date. Beans roasted to order retain far more aroma and character than bags that have sat on a shelf. Choosing fresh roasted coffee beans comes down to three checks:
- Roast date on the bag, not just a best-by date. If there's no roast date, that's a signal.
- Whole bean over pre-ground. Ground coffee stales in days; whole beans hold up far longer.
- Roast level matched to your method. Darker roasts are more soluble and forgiving on entry-level equipment; lighter roasts reward precise temperature control.
Store beans in an airtight container away from light and heat, and buy quantities you'll finish within a few weeks. USM Coffee roasts every batch to order, sourcing from trusted farms: the shorter the gap between roast and brew, the better the cup.
Specialty Coffee Association brewing standards and resources
FDA guidance on food storage and freshness labeling
Workflow Ergonomics and the Budget-to-Pro Upgrade Path
Two things separate a frustrating home barista setup from a pleasant one, and neither is a tool you buy: how you arrange the station, and how you sequence your purchases.
Workflow Ergonomics: Arrange for the Sequence, Not the Aesthetic
A home barista workflow runs in one direction: grind → dose → distribute → tamp → pull → knock → clean. Every time you reverse direction or reach across the machine, you add seconds and create mess. The goal is a station where each step hands off to the next.
A layout that works in most kitchens:
- Grinder on the left of the espresso machine (or the side opposite your dominant hand, so you're not reaching over the machine).
- Scale and dosing cup directly in front of the grinder, so you can weigh the dose without moving.
- WDT tool, distribution tool, and tamper in a small tray between the grinder and the machine, within one hand's reach of the portafilter.
- Dosing funnel resting on the portafilter when not in use, not in a drawer.
- Knock box on the right of the machine, on the side you naturally turn toward after pulling a shot.
- Cleaning brush and a small towel within reach of the group head, so wiping the shower screen is a two-second habit rather than a chore.
Small stations benefit most from this discipline, because there's no room to recover from a bad layout. If your counter is tight, a riser holding the grinder and scale together can consolidate the prep zone.
The Upgrade Path: Buy in Impact Order, Not Price Order
The most expensive mistake in this hobby is buying a machine before fixing your grind. A machine cannot compensate for inconsistent particles. Sequence your spending by what changes the cup:
Tier 1, Buy first (biggest cup impact):
- Burr grinder (the single highest-leverage purchase)
- Precision scale with 0.1g resolution
- Basic tamper that fits your basket
Tier 2, Add next (consistency and repeatability):
- WDT tool and a calibrated or spring-loaded tamper
- Dosing funnel matched to your portafilter size
- Knock box and a dedicated cleaning brush
Tier 3, Add when your skills outgrow Tier 1 and 2:
- Temperature-controlled gooseneck kettle (only if pour-over is in your routine)
- Upgraded burr set or a second grinder dedicated to espresso
- Machine upgrade, last, not first
Home baristas often buy the machine first because it's the most visible object on the counter, then discover the grinder is what they actually needed. Reverse that order and you'll spend less and drink better.
Calibration and Maintenance Cadence
Long-term value comes from knowing when to recalibrate, not just when to clean. A reasonable starting cadence:
- Scale: verify with a calibration weight every few months, or anytime readings seem off.
- Grinder burrs: inspect for wear annually under daily use; replace when grind consistency drifts or you need to grind noticeably finer for the same shot time.
- Group head and basket: brush daily, backflush weekly if your machine supports it.
- Descaling: follow your machine manufacturer's schedule, hard water means more frequent descaling.
- Steam wand: purge and wipe after every use; soak the tip weekly.
Frequently Asked Questions
Do I need a scale to make good coffee at home?
A scale is essential for consistent results. Coffee extraction depends on the ratio of coffee to water, and guessing leads to sour or bitter shots. A precision scale with 0.1g accuracy lets you measure your dose and track yield. For espresso, aim for a 1:2 ratio (18g coffee in, 36g espresso out). For pour-over, a 1:15 to 1:17 ratio works well. Without a scale, you cannot repeat a good shot or fix a bad one.
What is the most important piece of equipment for a home coffee bar?
The grinder matters most. Freshly ground coffee loses aroma within minutes, so grinding right before brewing preserves flavor. A burr grinder produces uniform particles for even extraction, while blade grinders create inconsistent chunks that lead to channeling. The Baratza Encore, for example, offers 40 settings and a high-torque motor that keeps beans cool. Pair it with fresh roasted coffee beans from USM Coffee for the best results.
How do I choose the right coffee grinder for home brewing?
Match the grinder to your brew method. For espresso, look for a grinder with fine, stepless adjustments and a burr set designed for espresso. For pour-over or drip, a stepped burr grinder like the Baratza Encore works well. Avoid blade grinders, which chop unevenly. Consider your budget and how often you brew. A user-serviceable grinder with replacement parts available will last longer and adapt as your skills grow.
What are the must-have accessories for espresso machines?
Beyond the machine itself, you need a tamper, a distribution tool, and a knock box. A spring-loaded tamper like the Normcore ensures level, consistent pressure. A WDT tool breaks up clumps to prevent channeling. A knock box makes puck disposal clean and quiet. Add a precision scale for dosing and a milk frothing pitcher if you make milk drinks. These tools turn a basic machine into a reliable home barista setup.
How do I choose fresh roasted coffee beans?
Check the roast date, not just the expiration date. Beans taste best within two to four weeks of roasting. Look for bags with a one-way degassing valve and opaque packaging to protect from light. Buy from roasters who roast to order, like USM Coffee, so you receive beans at peak freshness. Store beans in an airtight container away from heat and light. Grind just before brewing to preserve aroma and flavor.