

How to Brew Better Drip Coffee: 7 Steps
Table of Contents
- What You'll Need Before Brewing
- Getting the Coffee-to-Water Ratio Right for Drip Coffee
- Choosing the Best Grind Size for Your Drip Coffee Maker
- Water Temperature for Drip Coffee: Finding Your Sweet Spot
- Master the Bloom Technique to Improve Extraction
- How to Clean a Drip Coffee Maker for Better Flavor
- Common Mistakes That Ruin Your Brew
- Conclusion
- Frequently Asked Questions
Last Updated: September 3, 2026
What You'll Need Before Brewing
Brewing better drip coffee starts with the right equipment and ingredients. You'll need a burr grinder, a reliable drip coffee maker, whole coffee beans, filtered water, and a kitchen scale. Each component plays a critical role in extraction and flavor development.
A burr grinder is non-negotiable. Blade grinders produce inconsistent particle sizes, which leads to uneven extraction and muddy flavor. Burr grinders, either flat or conical, crush beans uniformly, giving you control over grind size. This consistency matters far more than the brand of grinder you choose.
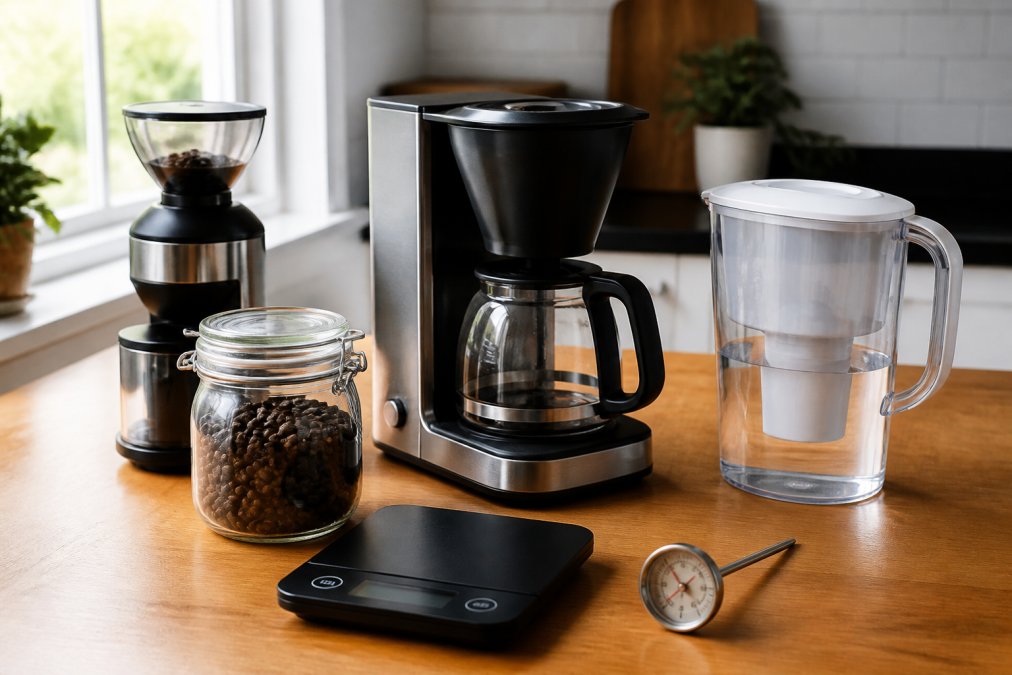
Your drip coffee maker should maintain stable water temperature throughout the brew cycle. Cheaper machines fluctuate, which disrupts extraction. Mid-range machines with thermal carafes or heated plates perform better than budget models. If you're serious about brewing better drip coffee, invest in a machine that holds temperature consistently, it's the foundation everything else builds on.
Filtered water matters more than most people realize. Tap water contains minerals and chlorine that interfere with flavor extraction. Use filtered or bottled water for every brew. Total Dissolved Solids (TDS) in your water affects how efficiently your coffee extracts; aim for water with moderate mineral content, not distilled, not heavily mineralized.
Fresh beans are essential. USM Coffee roasts to order and ships quickly, ensuring your beans arrive at peak freshness. Stale beans, no matter how good the brewing technique, produce flat, lifeless coffee. Buy beans roasted within the last two weeks and use them within four weeks of the roast date.
Getting the Coffee-to-Water Ratio Right for Drip Coffee
The coffee-to-water ratio determines brew strength and extraction efficiency. The industry standard is 1:16, one part coffee to 16 parts water by weight (sca.coffee). This ratio produces balanced, full-bodied coffee for most palates.
Start with this baseline: 30 grams of coffee to 480 milliliters of water. Use a kitchen scale; it's far more accurate than scoops. Measure both your dry coffee and your water before brewing. This precision removes guesswork and gives you repeatable results.
Adjust from there based on taste. If your brew tastes weak or sour, you're under-extracting, move toward 1:15 (slightly more coffee). If it tastes bitter or harsh, you're over-extracting, move toward 1:17 (slightly more water). Small adjustments compound quickly. A shift from 1:16 to 1:15 is the difference between a mediocre cup and a good one.
The coffee-to-water ratio interacts with grind size and water temperature. A coarser grind needs slightly more time in contact with water, so you might use 1:16 with medium-coarse grounds. A finer grind extracts faster, so you might use 1:17 with medium-fine grounds to avoid over-extraction. These variables work together, changing one affects how the others perform.
| Coffee-to-Water Ratio | Brew Strength | Best For | Extraction Style |
|---|---|---|---|
| 1:17 | Light, delicate | Lighter roasts, floral notes | Under-extracted prevention |
| 1:16 | Balanced, full-bodied | Most coffees, standard preference | Optimal extraction |
| 1:15 | Bold, intense | Dark roasts, morning brewing | Rich body, higher intensity |
Keep a brewing journal. Write down your ratio, grind size, water temperature, and brew time for each pot. Note how it tastes. After 10-15 brews, patterns emerge. You'll discover your personal sweet spot and understand how variables interact to shape flavor.
Choosing the Best Grind Size for Your Drip Coffee Maker
Grind size controls how quickly water passes through the coffee bed and how much surface area water contacts. Finer grinds slow water flow and increase extraction time. Coarser grinds speed water flow and decrease extraction time. Your drip maker's brew cycle typically lasts 4-6 minutes, so you need a grind that fills that window.
Medium-coarse is the target for most drip machines. This size lets water flow through evenly without channeling (water finding a path of least resistance through the grounds). It also gives enough contact time for proper extraction without over-extracting. Aim for grounds that look like breadcrumbs or coarse sand.
If your coffee tastes sour or thin, your grind is too coarse. Water moves through too fast, under-extracting the coffee. Move to a finer setting on your grinder. If your coffee tastes bitter or harsh, your grind is too fine. Water moves too slowly, over-extracting the coffee. Move to a coarser setting.
Consistency matters as much as size. A burr grinder produces uniform particles. A blade grinder produces a mix of fines (powder), medium particles, and chunks. This inconsistency creates uneven extraction, some grounds over-extract while others under-extract. The result is muddy, confused flavor.
The best grind size for your drip coffee maker depends on your specific machine's design. Machines with flat brew baskets benefit from slightly coarser grounds. Machines with cone-shaped baskets work better with medium-coarse grounds. Experiment within the medium-coarse range and adjust based on taste.
Water Temperature for Drip Coffee: Finding Your Sweet Spot
Water temperature controls extraction speed and flavor development. Too cold and extraction stalls, you get sour, under-extracted coffee. Too hot and extraction accelerates, you get bitter, over-extracted coffee. The optimal range is 195-205°F (90-96°C) (sca.coffee).
Most drip machines heat water to around 200°F, which sits in the middle of the ideal range. However, not all machines maintain this temperature throughout the brew cycle. Cheaper machines cool as they brew. If your machine doesn't use a thermal carafe or heated plate, water temperature can drop 10-15°F during brewing, which disrupts extraction.
Use a thermometer to measure your machine's actual water temperature. Place it in the brew basket before starting. If the water reads below 195°F, your machine isn't heating adequately. If it reads above 205°F, you risk over-extraction. This simple test reveals whether your machine is performing as advertised.
Water temperature interacts with grind size and brew time. A finer grind extracts faster at higher temperatures, so use 200°F with medium-fine grounds. A coarser grind needs more time and temperature to extract fully, so use 202-205°F with coarse grounds. These adjustments keep extraction balanced.
The roast profile of your beans also affects optimal temperature. Light roasts benefit from slightly hotter water (203-205°F) because they're denser and require more heat to extract fully. Dark roasts benefit from slightly cooler water (198-200°F) because they're already more porous and extract more easily. This nuance separates adequate brewing from excellent brewing.
Master the Bloom Technique to Improve Extraction
The bloom is the first 30-45 seconds of brewing, when hot water first contacts dry coffee grounds. During this phase, carbon dioxide trapped in the grounds escapes, and water begins penetrating the bean structure. A proper bloom improves extraction efficiency and flavor clarity.
Start your brew by pouring just enough hot water to saturate the grounds, roughly twice the weight of your dry coffee. For 30 grams of coffee, use about 60 milliliters of water. Let this sit for 30-45 seconds without disturbing it. You'll see the grounds expand and bubble as CO2 escapes. This is the bloom working.
After the bloom, pour the remaining water slowly and evenly. Avoid pouring in one spot; distribute water across the entire brew basket. This technique, called agitation, keeps the coffee bed saturated and promotes even extraction. Pour in stages if your machine allows it, pour half the remaining water, wait 30 seconds, then pour the rest.
The bloom technique addresses a common problem: channeling. If water finds a path through the grounds without contacting all the coffee, you get uneven extraction. A proper bloom ensures water penetrates the entire bed from the start, preventing channels from forming.
Advanced brewers measure bloom quality by observing how the coffee bed settles. After the bloom, grounds should be evenly saturated with no dry spots. If you see dry patches, your water distribution during the bloom was uneven. Adjust your pour technique, use a gooseneck kettle for better control if your drip machine allows manual pouring.
How to Clean a Drip Coffee Maker for Better Flavor
Mineral buildup and old coffee residue accumulate inside your drip machine, degrading flavor and thermal stability. A clean machine brews better coffee. Clean your machine after every use and deep-clean it monthly.
Daily cleaning is simple: empty the used grounds and filter, rinse the brew basket and carafe with hot water, and wipe the machine's exterior. This removes loose debris and prevents mold growth. Spend 60 seconds on this step, it makes a measurable difference in brew quality.
For monthly deep cleaning, use a descaling solution. Fill the water reservoir with a 1:1 mixture of white vinegar and water. Run a brew cycle without coffee grounds. This acidic solution dissolves mineral deposits that accumulate on heating elements and inside the machine. After the vinegar cycle completes, run two full cycles with plain water to rinse thoroughly.
How to clean a drip coffee maker matters because mineral deposits reduce water temperature and slow flow rate. This disrupts extraction timing and can create off-flavors. A descaled machine maintains consistent water temperature and optimal brew conditions.
Some machines have built-in cleaning cycles. Check your manual, if your machine has this feature, use it monthly. If not, the vinegar method works equally well. The key is consistency. Monthly descaling prevents buildup that becomes harder to remove if neglected.
Pay special attention to the spray head (the part that distributes water over the grounds). Mineral deposits here create uneven water distribution, leading to channeling. Soak the spray head in vinegar for 15 minutes, then scrub gently with a soft brush. This ensures water flows evenly across the entire brew basket.
Common Mistakes That Ruin Your Brew
Most people make the same brewing errors repeatedly. Understanding these mistakes transforms your coffee quality.
Using stale beans. Coffee begins losing flavor 2-3 weeks after roasting. Store beans in an airtight container away from light and heat. Buy fresh beans weekly and use them within 4 weeks of the roast date. USM Coffee ships fresh-roasted beans, which helps ensure you receive fresh beans.
Grinding too fine. The most common mistake. Fine grounds look impressive and feel satisfying to use, but they over-extract drip coffee in 4-6 minutes. The result is bitter, harsh flavor. Medium-coarse is the target. If you're uncertain, grind slightly coarser than you think you need, you can always adjust finer next time.
Ignoring water quality. Tap water contains chlorine and minerals that interfere with extraction. Filtered water costs nothing compared to the improvement it delivers. This single change often produces the biggest flavor jump for home brewers.
Skipping the bloom. Rushing into the full pour skips the CO2 release phase and creates channeling. A 30-45 second bloom takes minimal time and improves extraction measurably. This is not optional for better drip coffee.
Using the wrong water temperature. If your machine heats water below 195°F, extraction stalls. If it heats above 205°F, over-extraction begins. Check your machine's actual temperature with a thermometer. Many cheap machines underperform here.
Brewing with a dirty machine. Mineral deposits and old coffee residue create stale, flat flavor. Monthly descaling with vinegar restores brew quality. This takes 15 minutes and costs almost nothing.
Inconsistent ratios. Eyeballing coffee amounts produces inconsistent results. A kitchen scale costs $15-20 and removes guesswork. Weigh your coffee and water every time. Consistency is how you learn what works.
Storing beans in the freezer. Freezing and thawing damages bean structure and accelerates flavor loss. Store beans in an airtight container at room temperature. Use them quickly, fresh beans in a warm cupboard beat old beans in a freezer.
Conclusion
Brewing better drip coffee requires attention to five variables: grind size, water temperature, coffee-to-water ratio, water quality, and brew time. These interact constantly. Change one and you shift the others. The bloom technique and monthly cleaning round out the fundamentals.
Start with the coffee-to-water ratio at 1:16, medium-coarse grind, 200°F water, filtered water, and a 30-45 second bloom. Brew one pot and taste it. If it's sour, grind finer or use slightly hotter water. If it's bitter, grind coarser or use slightly cooler water. Keep a brewing journal. After 10-15 brews, you'll understand your machine and your preferences.
Fresh-roasted beans make every technique more effective. Stale beans limit what even perfect brewing can achieve. USM Coffee roasts to order and ships quickly, ensuring your beans arrive at peak freshness. With fresh beans and the techniques outlined here, you'll brew better drip coffee every morning. Specialty Coffee Association brewing standards recommend these same fundamentals, consistency, measurement, and attention to water quality, as the foundation of quality home brewing.
Frequently Asked Questions
What is the best coffee-to-water ratio for drip coffee?
A: The standard ratio is 1:16 (one part coffee to 16 parts water by weight). For a 12-cup drip maker, this typically means 0.75 ounces of ground coffee per 12 fluid ounces of water. If you prefer stronger coffee, adjust to 1:15. Weaker coffee works at 1:17. Use a scale for precision, measuring by spoons introduces inconsistency that affects extraction and flavor.
How does grind size affect drip coffee extraction?
A: Grind size controls how quickly water passes through the grounds. Medium-coarse grinds (similar to sea salt) are ideal for standard drip makers, allowing 4-6 minutes of contact time. Too fine, and water moves slowly, causing over-extraction and bitterness. Too coarse, and extraction happens too fast, leaving your coffee sour and under-extracted. Consistency matters as much as size, a burr grinder produces uniform particles better than blade grinders.
Why does water temperature matter for drip coffee brewing?
A: Water between 195-205°F extracts coffee compounds at the right rate. Below 195°F, extraction is incomplete, producing weak, sour coffee with thin body. Above 205°F, you risk over-extraction, which creates bitter, harsh flavors. If your machine doesn't hold temperature well, use slightly hotter water when filling the reservoir to account for heat loss during the brew cycle. Filtered water also matters, minerals affect extraction and flavor.
What is the bloom technique and why use it in drip coffee?
A: Blooming means pouring just enough hot water to wet the grounds (about twice the weight of dry coffee) and waiting 30-45 seconds before continuing. This releases CO2 trapped in the beans and allows water to saturate the grounds evenly, improving extraction. Many automatic drip makers skip this step, but manual pour-over methods benefit greatly. Fresh roasted beans bloom more visibly than stale ones, confirming freshness and improving overall flavor balance.