

How to Make Pour Over Coffee Taste Less Bitter
Table of Contents
- Why Pour Over Coffee Tastes Bitter (and What Actually Fixes It)
- The Best Grind Size for Pour Over (and How to Spot It)
- Ideal Water Temperature for Coffee Brewing
- How to Prevent Over-Extraction: Ratio, Time, and Pour Technique
- Water Quality and Filtration: The Mineral Content Factor
- Coffee Bean Freshness and Roast Level: Why Darker Roasts Taste Bitter
- TDS and Refractometer Basics: Measuring Extraction at Home
- Common Mistakes to Avoid When Dialing In Pour Over
- Frequently Asked Questions
Last Updated: September 13, 2026
Why Pour Over Coffee Tastes Bitter (and What Actually Fixes It)
Bitterness in pour over coffee almost always comes from over-extraction: hot water pulling too many harsh compounds out of the grounds. The fix is rarely a new recipe. It's identifying which single variable, grind, temperature, ratio, or pour technique, pushed extraction too far. This guide walks through each one so you can diagnose the cup in front of you instead of guessing.
Most troubleshooting guides tell you to "adjust your grind." That's incomplete: bitterness and sourness sit on opposite ends of the same extraction scale, and the direction you move depends on which one you're tasting.
The difference between bitter and sour
Bitterness is a dry, lingering, sometimes ashy sensation that coats the back of your tongue. It signals over-extraction. Sourness is a sharp, acidic bite that hits the sides of your tongue and fades quickly. It signals under-extraction. If your coffee tastes both sour and bitter at once, you likely have uneven extraction, often from channeling, where water punches through one path in the coffee bed instead of saturating it evenly.
The Best Grind Size for Pour Over (and How to Spot It)
The best grind size for pour over is a medium grind, roughly the texture of table salt, that lets water pass through the coffee bed in two to four minutes. Too fine and water stalls, over-extracting bitter compounds; too coarse and water rushes through, leaving sour, weak coffee.
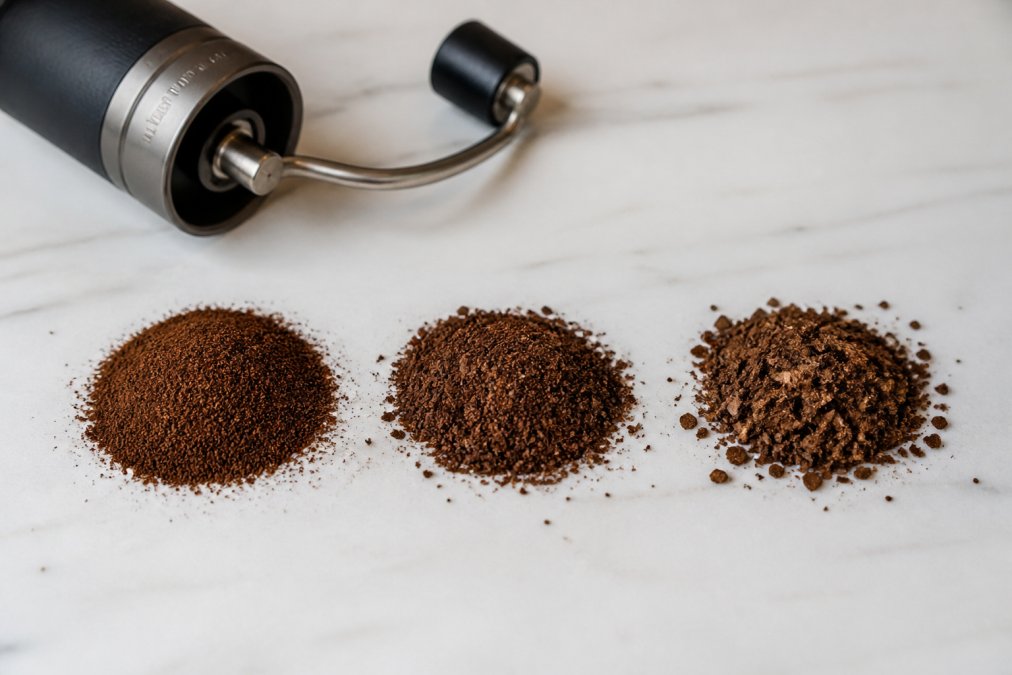
If your brew tastes bitter, grind coarser in small steps, one or two clicks on a burr grinder, and taste again.
Visual grind size guide: fine, medium, coarse
You don't need a microscope, just a reference point:
- Fine: powdery, clumps when pinched, like espresso. Too fine for pour over.
- Medium: grainy, like table salt or coarse sand. This is your target.
- Coarse: chunky, like sea salt or raw sugar. Use this if your brew keeps stalling.
Don't judge grind by eye alone. Pinch a sample: if it feels like flour, you've gone too fine.
Ideal Water Temperature for Coffee Brewing
The ideal water temperature for coffee brewing is between 195°F and 205°F (sca.coffee). Water below that range under-extracts and tastes sour; water at a rolling boil scorches the grounds and amplifies bitterness. Without a variable-temperature kettle, let boiled water rest about 30 seconds before pouring.
Temperature is the variable people overlook most. They'll spend money on a grinder and then brew with water straight off a rolling boil. That single habit can turn a good roast bitter before the grind even matters. For a fuller breakdown of brewing variables, the Specialty Coffee Association's brewing standards is worth reading.
How to Prevent Over-Extraction: Ratio, Time, and Pour Technique
To prevent over-extraction, control three things together: the coffee-to-water ratio, total brew time, and how you pour. Changing just one rarely fixes bitterness.
Coffee-to-water ratio and brew time
Start with a 1:15 to 1:16 ratio by weight, one gram of coffee to roughly fifteen or sixteen grams of water. A digital scale makes this repeatable; scoop measurements don't. Total brew time should land between two and four minutes, including the bloom; consistently past four minutes means your grind is too fine or your pour too slow (sca.coffee).
Pouring technique, agitation, and draw-down time
Draw-down time is how long the water takes to drain through the coffee bed after your final pour; a slow draw-down points to a clogged filter or overly fine grind. Pour in steady spirals from the center outward, avoiding one-spot dumping that causes channeling. A gentle stir during the bloom saturates grounds evenly, but aggressive agitation pushes fines to the bottom and slows everything down.
| Problem | Likely Cause | Fix |
|---|---|---|
| Bitter, dry finish | Over-extraction | Grind coarser, lower temp |
| Sour, sharp taste | Under-extraction | Grind finer, raise temp |
| Slow draw-down | Grind too fine or filter clogged | Coarsen grind, rinse filter |
| Both sour and bitter | Uneven extraction | Improve pour and agitation |
Water Quality and Filtration: The Mineral Content Factor
Water is roughly 98% of your finished cup, yet it's the variable most brewers never touch. If your grind, temperature, and ratio are dialed in and the cup still tastes harsh or flat, water is the next suspect. Water doesn't dissolve coffee by itself, dissolved minerals do the work. Calcium and magnesium ions bind to flavor compounds and carry them into the brew; strip them out and extraction stalls, overload them and the same ions pull harsh, bitter compounds.
What good brewing water actually looks like
The Specialty Coffee Association publishes a widely cited water standard with concrete targets:
- Total hardness: roughly 50-175 ppm as calcium carbonate. Below ~50 ppm, extraction weakens and the cup tastes hollow. Above ~175 ppm, bitterness and chalkiness creep in.
- Alkalinity (bicarbonate): roughly 40-70 ppm. This is the buffer that neutralizes coffee's natural acids. Too much alkalinity and the cup tastes flat and dull; too little and the acidity turns sharp and sour.
- pH: around 7.0 (neutral). Coffee itself is acidic, so alkaline water mutes it and acidic water amplifies it.
- Chlorine and chloramine: effectively zero. These are the two compounds most responsible for the 'swimming pool' taste that survives even good beans.
- Total dissolved solids (TDS): roughly 75-250 ppm.
You don't need a lab kit. A $15-$30 TDS pen gives a rough read on total mineral load, and most municipal utilities publish a free annual water quality report (CCR) listing hardness and alkalinity.
Matching your filter to your water
Different filtration methods do different jobs, and picking the wrong one is a common source of bitterness:
- Carbon block or granular carbon filters (pitcher or faucet-mounted): remove chlorine, chloramine, and some sediment, but leave most calcium and magnesium intact. This is the right choice for most households with moderately hard water.
- Reverse osmosis (RO): strips nearly everything, including the minerals you need. Straight RO water brews flat, hollow coffee. If you use RO, you'll want to remineralize, either with a dedicated brewing-water mineral packet or by blending a small amount of tap water back in.
- Distilled water: same problem as RO, worse. Zero minerals means near-zero extraction. Never brew with straight distilled water.
- Water softeners: these swap calcium and magnesium for sodium. Sodium doesn't extract coffee well, so softened water often produces a flat, salty-leaning cup. If your whole house is on a softener, pull your brewing water from an unsoftened tap or use bottled spring water.
A practical diagnostic
If your coffee tastes bitter and you've already coarsened the grind, brew two identical cups, one with your normal water, one with bottled spring water (moderate hardness on the label). If the spring-water cup is noticeably smoother, your tap water's mineral profile is the culprit, not your technique, saving you from chasing grind settings that were never the problem.
Why this matters more than most guides admit
Most troubleshooting articles list 'use filtered water' as a throwaway line. But water chemistry interacts directly with the other variables here: hard water and a fine grind compound each other toward bitterness, soft water and a coarse grind compound in the opposite direction. Change your water source without re-dialing your grind and you'll chase your tail. Treat water as a fixed input, dial everything else around it, and change it only deliberately.
Coffee Bean Freshness and Roast Level: Why Darker Roasts Taste Bitter
Darker roasts taste bitter more easily because roasting develops bitter compounds as sugars caramelize and, past a point, char. A dark roast has less margin for error: brew it slightly too hot or too fine and bitterness dominates. Freshly roasted beans also release carbon dioxide in a process called degassing, which is why a very fresh roast can taste flat or uneven for the first few days.
Degassing and freshly roasted beans
Beans roasted within the last few days are still degassing heavily, and that trapped gas interferes with even extraction. Give them a few days to rest, or extend your bloom time to let the gas escape. We roast every batch to order, so beans arrive close to their roast date, a slightly longer bloom often smooths out the first cup.
TDS and Refractometer Basics: Measuring Extraction at Home
Every other section in this guide asks you to trust your palate; this one gives you a number. A refractometer measures total dissolved solids (TDS), the percentage of your finished brew, by weight, that is dissolved coffee, and from that you can calculate extraction yield (EY), the percentage of dry grounds that made it into the cup. EY is the single most useful diagnostic number in pour over brewing, and almost no home-focused guide explains how to use it.
The two numbers that matter
-
TDS is what the refractometer reads directly. For pour over, most balanced cups land somewhere around 1.15%-1.45% TDS, though this varies with roast level and personal preference.
-
Extraction yield is calculated from TDS using the brew ratio. The formula is:
EY% = (TDS% × grams of brewed coffee) ÷ grams of dry coffee
For example: you brew 15 g of dry coffee and end up with 240 g of liquid coffee in the carafe. Your refractometer reads 1.30% TDS. The math is (1.30 × 240) ÷ 15 = 20.8% extraction yield. That sits comfortably in the commonly cited 18%-22% 'balanced' window.
What the numbers tell you that taste alone can't
Taste tells you that something is wrong. Extraction yield tells you which direction to move and how far:
- EY below ~18% (under-extracted): the cup tastes sour, thin, and salty. Grind finer, raise water temperature, or extend brew time.
- EY above ~22% (over-extracted): the cup tastes bitter, dry, and ashy, the exact problem this article is about. Grind coarser, lower temperature, or shorten brew time.
- EY in the 18%-22% window but the cup still tastes bitter: this is the case most guides miss. If extraction yield is in range and the coffee is still bitter, the problem is usually the beans themselves, a dark roast with heavy roast-developed bitterness, or water with excessive alkalinity. No grind adjustment will fix it. Change the roast level or the water.
That last scenario is why a refractometer is worth owning: without it, a brewer chasing bitterness keeps coarsening the grind past usefulness, ending up with a weak, sour, and bitter cup.
What you actually need to buy
You don't need a laboratory-grade instrument. A handheld optical or digital coffee refractometer runs roughly $100-$300; digital models that take a small filtered sample are most consistent for home use. You'll also need:
- A 0.1 g precision scale for weighing both dry coffee and brewed yield. A standard 1 g kitchen scale isn't accurate enough for the EY calculation.
- Distilled water for rinsing the prism between readings, tap water leaves mineral residue that skews results.
- A pipette or syringe to pull a clean, particle-free sample. Grounds in the sample will throw the reading off.
Calibrating and reading consistently
Refractometers drift. Calibrate with distilled water before each session, it should read 0.00%. Let samples cool to room temperature; hot liquid reads inaccurately on most models. Take two or three readings per brew and average them, since a single reading can be off by 0.05% or more.
When to skip the refractometer
If you're happy with your coffee, you don't need one. A refractometer is for the specific frustration of 'I've adjusted everything and still can't figure out why this cup is bitter.' It converts that frustration into a number that tells you whether to keep adjusting the brew or change the beans, for most home brewers, the difference between a week of guesswork and an afternoon of dialing in.
Common Mistakes to Avoid When Dialing In Pour Over
Dialing in means changing one variable at a time and tasting between adjustments. The most common mistake is changing everything at once, which makes it impossible to know what worked. Other frequent errors:
- Grinding too fine to "get more flavor," which just adds bitterness
- Using boiling water straight from the kettle
- Skipping the rinse on your filter paper, which leaves a papery taste
- Pouring too fast and causing channeling
- Ignoring water quality entirely
A second mistake is chasing a recipe from someone else's kitchen. Their grinder, water, and beans differ from yours, so their exact settings won't transfer. Use their numbers as a starting point, then adjust to your own taste.
Bitterness in pour over coffee is a solvable problem, not a permanent flaw in your setup. Work through grind, temperature, ratio, and water one at a time, and you'll land on a cup that tastes the way the roast intended. When you want beans fresh enough to make that dialing-in process worthwhile, we roast every batch to order from carefully sourced farms, with a simple ordering process and fast, reliable delivery. Experience the perfect brew with us.
Frequently Asked Questions
Why does pour over coffee taste bitter?
Bitterness in pour over coffee usually comes from over-extraction: water stays in contact with the grounds too long, the grind is too fine, or the water is too hot. These conditions pull out harsh compounds instead of sweetness. Adjusting one variable at a time, starting with grind size, then water temperature, then brew time, will help you identify the cause and fix it.
Does grind size affect coffee bitterness?
Yes. A grind that is too fine slows water flow, increases contact time, and leads to over-extraction and bitterness. For pour over, aim for a medium grind similar to table salt. If your brew tastes bitter and the draw-down takes longer than about 3 to 4 minutes, try a coarser grind. If it tastes sour and drains too fast, go finer.
Is water temperature important for pour over coffee?
Water temperature directly affects extraction. The ideal water temperature for coffee brewing is between 195°F and 205°F. Water above 205°F can scorch the grounds and add bitterness, while water below 195°F may under-extract and taste sour. Use a variable-temperature kettle or let boiled water rest for about 30 seconds before pouring.
How do you neutralize bitter taste in pour over coffee?
You can reduce bitterness by coarsening the grind, lowering the water temperature slightly, shortening the brew time, or using a higher coffee-to-water ratio (more water). Also check your water quality: very hard water with high mineral content can amplify bitterness. Filtered water with balanced minerals often makes a noticeable difference in the cup.