

How to Grind Coffee Beans for AeroPress
Table of Contents
- Why Grind Size Matters for AeroPress Brewing
- Best Burr Grinder for AeroPress
- AeroPress Grind Size Chart and Consistency Guide
- AeroPress Brewing Time vs Grind Size
- Step-by-Step Grinding Instructions
- Troubleshooting Bitter or Sour Coffee
- Common Mistakes to Avoid
- Frequently Asked Questions
Last Updated: September 22, 2026
Why Grind Size Matters for AeroPress Brewing
When you grind coffee beans aeropress-style, grind size controls extraction, determining whether your coffee tastes bright and clean or bitter and harsh. Getting it right transforms your entire brewing experience.
Water moves through coffee grounds at different speeds depending on particle size. Fine grounds slow water down; coarse grounds let it rush through. The exact spot matters enormously for AeroPress.
Too little contact time produces sour, under-extracted coffee; too much produces bitter, over-extracted coffee. The sweet spot delivers balanced, clean flavors.
Best Burr Grinder for AeroPress
A burr grinder produces consistent particle size; a blade grinder creates chaos with powder and chunks mixed together. The AeroPress needs consistency, where blade grinders fail fundamentally.
Why Blade Grinders Don't Work for AeroPress
Blade grinders chop beans randomly, producing wildly uneven particle size, fine powder, medium particles, and large chunks mixed together.
This uneven mixture causes uneven extraction: powder over-extracts (bitterness), chunks under-extract (sourness), resulting in muddy, unbalanced coffee. You cannot adjust your way out of this problem.
Burr grinders crush beans between two abrasive surfaces set to a specific distance apart, producing nearly identical particle size. This uniform size ensures even extraction, the foundation of good AeroPress coffee.
Flat Burrs vs. Conical Burrs
Flat burrs grind faster and produce slightly more uniform particle size, but generate more heat that can damage flavor compounds. They're typically louder.
Conical burrs grind more slowly with less heat generation and better flavor preservation. They're more forgiving if your grind setting is off and generally quieter. For home AeroPress brewing, conical burrs are the better choice.
Adjustability and Grind Settings
After burr type, adjustability is most important. You need enough settings to move between medium-fine and medium-coarse without large jumps in particle size.
Budget grinders with only 5-8 settings lack control for AeroPress. Moving between settings causes large particle size jumps, leaving you stuck between "too sour" and "too bitter."
Look for a grinder with at least 15-20 settings for precision dialing. Many entry-level burr grinders in the $30-$60 range offer this. You need good adjustment resolution and consistent burr alignment, not expense.
Numbered settings (1-20) are easier to track and repeat than descriptive labels. If you find a setting that works, you can return to that exact number every time.
Grinder Maintenance for Consistency
Even good burr grinders lose consistency without maintenance. Stale grounds left in the chamber affect fresh grinds and cause clumping. Wipe out the catch chamber with a dry cloth before each use.
Over time, burrs can wear down or become misaligned. If your grinder produces uneven particle size after months of use, the burrs may need replacement. Most quality burr grinders allow this without buying a new machine.
AeroPress Grind Size Chart and Consistency Guide
The grind size for AeroPress depends on your brewing method. The standard method and inverted method need different grinds because water contact time changes.
Medium-Fine Grind for Standard Method
The standard AeroPress method uses medium-fine grounds, finer than drip coffee but coarser than espresso.
Medium-fine grounds create resistance to water flow, increasing extraction time. The finer particle size provides more surface area for water contact.
Medium-fine resembles damp sand: individual particles visible but sticking slightly together, holding shape briefly when squeezed.
Medium-fine works because the small AeroPress chamber and plunger pressure prevent water from rushing through. This combination creates balanced extraction in about 60 seconds.
Medium-Coarse Grind for Inverted Method
The inverted method flips the AeroPress upside down, significantly changing water contact time.
Grounds sit in water longer before pressing, allowing more extraction time. This extended steeping requires coarser grounds to avoid over-extraction.
Medium-coarse grounds resemble breadcrumbs, noticeably larger than medium-fine but smaller than French press grounds.
The inverted method is more forgiving with grind size because longer steeping allows gradual extraction, making over-extraction harder.
AeroPress Brewing Time vs Grind Size
Grind size and brew time work together. Finer grounds need less time. Coarser grounds need more time.
Single Origin Favorites Sample Pack →
For the standard method, total brew time is usually 60-90 seconds: blooming (30 seconds) plus pressing (30-60 seconds).
With medium-fine grounds, aim for the lower end of this range. Press steadily over 30 seconds. Fast pressing causes sour coffee; slow pressing causes bitterness.
For the inverted method, grounds steep for 2-3 minutes before pressing. This longer contact time is why inverted brewing needs coarser grounds.
Finer grounds require shorter brew time; coarser grounds require longer brew time. Sour coffee means grind finer or brew longer. Bitter coffee means grind coarser or brew faster.
Step-by-Step Grinding Instructions
Step 1: Measure Your Coffee Beans
For one AeroPress cup, use 15-17 grams of whole beans.
One rounded tablespoon approximates 15 grams if you lack a scale, though a scale is more accurate.
Measure beans before grinding, as grinding changes volume.
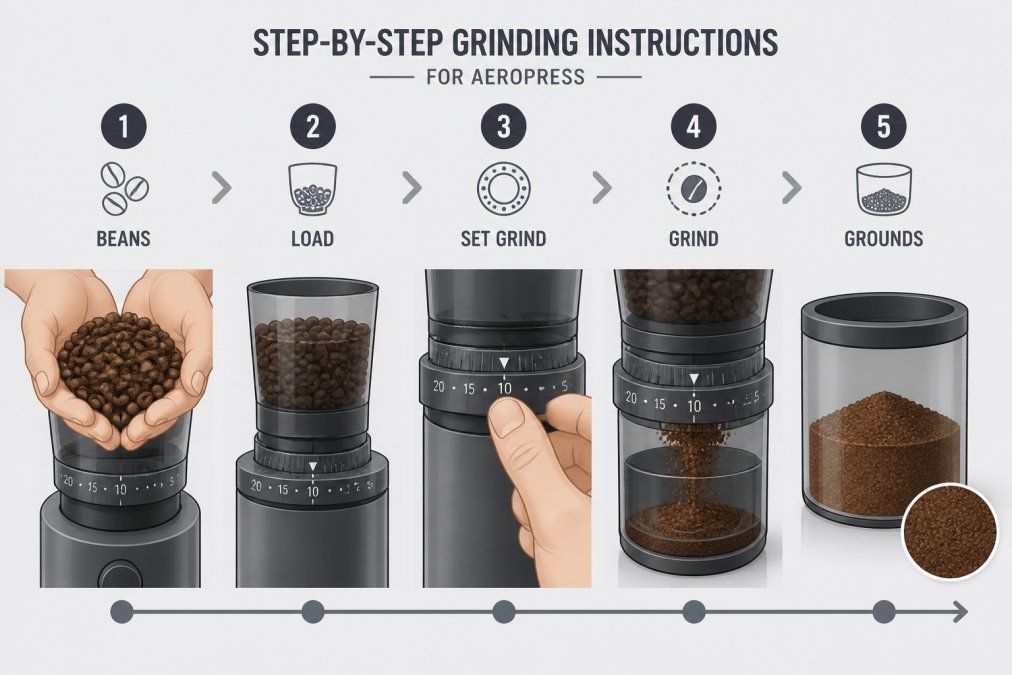
Step 2: Choose Your Grind Setting
For standard AeroPress, use medium-fine (usually around 6-8 on a 20-setting grinder). For inverted AeroPress, use medium-coarse (usually around 10-12). Start here and adjust after tasting.
If your grinder has fewer settings, pick the closest option. The exact number doesn't matter, what matters is the particle size.
Some grinders use number labels. Others use size descriptions like "medium" and "coarse." Find the setting that matches your method and stick with it until you taste the result.
Step 3: Grind Fresh and Check Consistency
Grind your beans immediately before brewing. Grounds lose flavor within 15-20 minutes of grinding. Fresh grounds taste noticeably better.
Pour beans into your grinder and press the button. The grinding takes 20-30 seconds for most burr grinders.
When grinding stops, look at the result. The grounds should look uniform. You shouldn't see large chunks or fine powder. If you see big chunks mixed with powder, your grinder needs adjustment or replacement.
Smell the grounds. Fresh-ground coffee smells vibrant and aromatic. If the smell is dull, the beans are old or the grinding created too much heat.
Pour the grounds into your AeroPress chamber. They should flow easily but not like sand. If they clump badly, they're too fine. If they flow like salt, they're too coarse.
Troubleshooting Bitter or Sour Coffee
Bitter coffee means over-extraction. Too much flavor was pulled from the grounds.
This happens when grounds are too fine, brew time is too long, or water is too hot. For AeroPress, the most common cause is grinding too fine.
If your coffee tastes bitter, grind coarser. Move your grinder setting up by 2-3 notches and brew again. This reduces surface area and speeds up water flow.
You can also reduce brew time. Press faster or use slightly cooler water. But the easiest fix is always the grind.
Sour coffee means under-extraction. Not enough flavor was pulled from the grounds.
This happens when grounds are too coarse, brew time is too short, or water is too cool. Grind finer to increase surface area.
Move your grinder setting down by 2-3 notches and brew again. You can also press slower to increase brew time.
If you're using old beans, they extract more slowly. Fresh roasted beans from USM Coffee extract faster and more evenly. Old beans from a grocery store shelf might need slightly finer grounds or longer brew time.
Common Mistakes to Avoid
Grinding too far in advance. Grounds lose flavor fast. Grind within 15 minutes of brewing. If you grind the night before, your coffee will taste flat and stale. Ground coffee has vastly more surface area than whole beans, so oxygen and moisture degrade it rapidly. Even 30 minutes of exposure to air noticeably dulls the flavor.
Using a blade grinder. Blade grinders create uneven particle size. Some grounds are powder, others are chunks.
Frequently Asked Questions
What grind size should I use for my AeroPress?
Use a medium-fine grind for the standard AeroPress method and medium-coarse for the inverted method. The particle size should resemble fine sand, consistent throughout with minimal dust (fines) or large pieces (boulders). A burr grinder gives you the control needed to dial in the exact consistency. Fresh-roasted beans like those from USM Coffee grind more evenly and extract better flavor when ground to the proper size.
How does grind size affect AeroPress brewing time?
Finer grinds increase surface area, speeding up extraction and reducing brew time to 1-1.5 minutes. Coarser grinds slow extraction, requiring 2-3 minutes of steeping. If your coffee tastes sour, it's under-extracted, use a finer grind or longer brew time. If it's bitter, it's over-extracted, switch to a coarser grind or brew faster. Adjusting grind size is the fastest way to dial in your AeroPress.
Why is a burr grinder better than a blade grinder for AeroPress?
Burr grinders produce uniform particle size, essential for consistent extraction and flavor. Blade grinders create uneven pieces, some fine dust, some large chunks, leading to inconsistent brewing and muddy, bitter coffee. For AeroPress, where immersion brewing relies on even water contact with all particles, a burr grinder is non-negotiable. The investment pays for itself in better-tasting coffee from your beans.
Should I grind my coffee right before brewing?
Yes. Freshly ground coffee extracts better flavor because ground beans have more surface area exposed to oxygen, but they lose aromatic compounds quickly. Grind immediately before brewing for maximum flavor and aroma. Buying fresh-roasted beans from USM Coffee and grinding them moments before brewing ensures you're getting the full potential of your coffee's tasting notes, whether it's the salted caramel of Peru or the fruity notes of Ethiopia.